
BACK TO FORD TRACTOR
This is what I built, not necessarly how it should be built. You may weld differently or use different materials therefore I can not and will not be responsible for any flaws, in structural integrity or design. The following information is provided for informational purposes only. |
 |
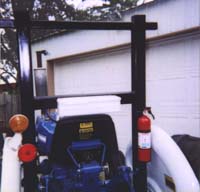
View of ROPS from the right side looking back. |
 |
||
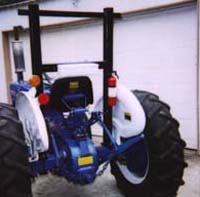
| View from the back. |
 |
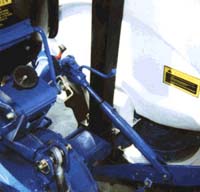
Tool box that was mounted on the left fender was moved and mounted to the lower cross member, and fire extinguisher mounted to back right hand side. |
 |
||
| Mounting needs to be done with 4-3/4" bolts per side, 3/4" plate and locking nuts. (SEE NOTES) |
 |
If I had moved the post all the way over against the fender and set it straight up, it might have allowed the leveling box handle to turn when the lift arms are up. So I didn't. (SEE NOTES) |
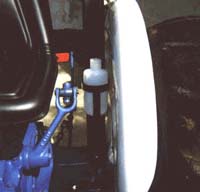 | ||
| Installed a water bottle holder on the left side. |
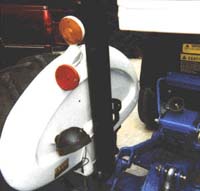 |
This is the reason for the magic 7 degree tilt. Had to stay out of the lights. I don't know if more or less tilt is better. |

|
This brace was set to be square to the vertical member and used as a backrest. If set level with the world, the face of the 3 x 3s would not match (corner would extend out pass the face of the vertical member). When leaning back the corner of the brace would hit you in the back instead of the flat face of the brace. Screen: Flat expanded metal can be added if planning to mow rocky ground with hog. Provides good protection. I chose not to install due to lack of rocks. Caps: Caps are 1/2" plate but can be anything 1/4", 3/8" ...this is what scrap I had. Top Brace: If I had it to do over, the top brace would not hang out so far. It's 3-1/2" (3" + 1/2" cap). I would drop back to 2" total. I think it would look better. Angle: Why 7 degrees...had to stay inside my lights. Also have not seen a ROPS vertical. Does it need to lean back more? What ever looks good to you. Bottom Mounting Plates: My loader mount got in the way so the bottom mounting plate is slightly off center, but bolts are plumb. I used self-locking nuts when I made the final mount to the tractor. Mounting bolts should be 4 - 3/4" bolts per side. The picture shows 2 - 5/8" bolts per side. This is not enough and will be changed when time permits.
Welding together: 1) Tack weld all joints and check for square by measuring diagonals before welding up solid.
After squaring up and tacking real well set ROPS on tractor, bolt down, set in seat and check things out. Now is the time to make necessary
or desirable changes.
Be advised that when the tractors lifting arms are UP, the leveling box handle can not be turned, handle hits ROPS, Tool Box: The original toolbox that was mounted on the left fender was in the way and had to be removed. Two holes were drill and tapped and box was mounted to back of ROPS. Used to hold spare pins and clips, gloves, PTO shaft cover when off, couple of rags, and shear pins for brush hog. Extras: I added a water jug holder to left side, below the seat to hold a quart bottle of water. and added a small fire extingusher to the right side, back. Why? Read this story. FIRE |
| Home Page | YTM |